Servlet 文件上传
Servlet 可以与 HTML form 标签一起使用,来允许用户上传文件到服务器。上传的文件可以是文本文件或图像文件或任何文档。
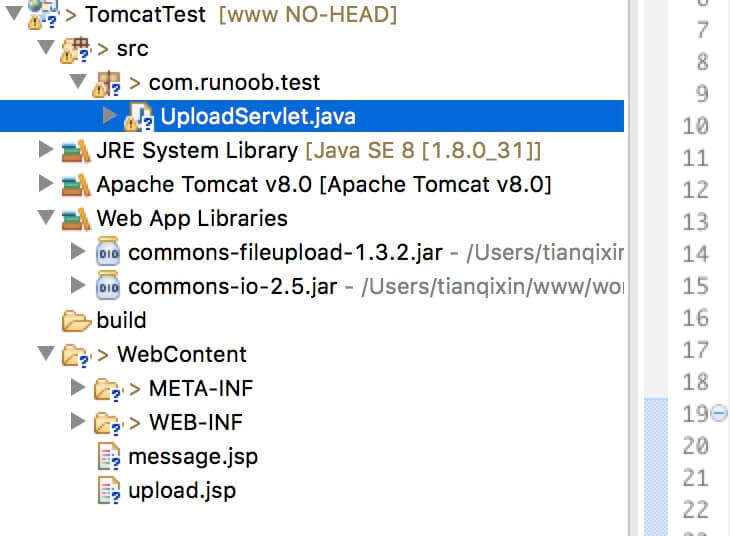
本文使用到的文件有:
- upload.jsp : 文件上传表单。
- message.jsp : 上传成功后跳转页面。
- UploadServlet.java : 上传处理 Servlet。
- 需要引入的 jar 文件:commons-fileupload-1.3.2、commons-io-2.5.jar。
结构图如下所示:

注意:Servlet3.0 已经内置了文件上传这一特性,开发者不再需要将 Commons FileUpload 组件导入到工程中去。
接下来我们详细介绍。
创建一个文件上传表单
下面的 HTML 代码创建了一个文件上传表单。以下几点需要注意:
- 表单 method 属性应该设置为 POST 方法,不能使用 GET 方法。
- 表单 enctype 属性应该设置为 multipart/form-data.
- 表单 action 属性应该设置为在后端服务器上处理文件上传的 Servlet 文件。下面的实例使用了 UploadServlet Servlet 来上传文件。
- 上传单个文件,您应该使用单个带有属性 type="file" 的 标签。为了允许多个文件上传,请包含多个 name 属性值不同的 input 标签。输入标签具有不同的名称属性的值。浏览器会为每个 input 标签关联一个浏览按钮。 upload.jsp 文件代码如下:
<%@ page language="java" contentType="text/html; charset=UTF-8"pageEncoding="UTF-8"%><!DOCTYPE html PUBLIC "-//W3C//DTD HTML 4.01 Transitional//EN""http://www.w3.org/TR/html4/loose.dtd"><html><head><meta http-equiv="Content-Type" content="text/html; charset=UTF-8"><title>文件上传实例 - 菜鸟教程</title></head><body><h1>文件上传实例 - 菜鸟教程</h1><form method="post" action="/TomcatTest/UploadServlet" enctype="multipart/form-data">选择一个文件:<input type="file" name="uploadFile" /><br/><br/><input type="submit" value="上传" /></form></body></html>
编写后台 Servlet
以下是 UploadServlet 的源代码,同于处理文件上传,在这之前我们先确保依赖包已经引入到项目的 WEB-INF/lib 目录下:
- 下面的实例依赖于 FileUpload,所以一定要确保在您的 classpath 中有最新版本的 commons-fileupload.x.x.jar 文件。可以从 http://commons.apache.org/proper/commons-fileupload/ 下载。
FileUpload 依赖于 Commons IO,所以一定要确保在您的 classpath 中有最新版本的 commons-io-x.x.jar 文件。可以从 http://commons.apache.org/proper/commons-io/ 下载。 你可以直接下载本站提供的两个依赖包:
- commons-io-2.5.jar UploadServlet 的源代码 如下所示:
package com.servlet.test;import java.io.File;import java.io.IOException;import java.io.PrintWriter;import java.util.List;import javax.servlet.ServletException;import javax.servlet.annotation.WebServlet;import javax.servlet.http.HttpServlet;import javax.servlet.http.HttpServletRequest;import javax.servlet.http.HttpServletResponse;import org.apache.commons.fileupload.FileItem;import org.apache.commons.fileupload.disk.DiskFileItemFactory;import org.apache.commons.fileupload.servlet.ServletFileUpload;/*** Servlet implementation class UploadServlet*/@WebServlet("/UploadServlet")public class UploadServlet extends HttpServlet {private static final long serialVersionUID = 1L;// 上传文件存储目录private static final String UPLOAD_DIRECTORY = "upload";// 上传配置private static final int MEMORY_THRESHOLD = 1024 * 1024 * 3; // 3MBprivate static final int MAX_FILE_SIZE = 1024 * 1024 * 40; // 40MBprivate static final int MAX_REQUEST_SIZE = 1024 * 1024 * 50; // 50MB/*** 上传数据及保存文件*/protected void doPost(HttpServletRequest request,HttpServletResponse response) throws ServletException, IOException {// 检测是否为多媒体上传if (!ServletFileUpload.isMultipartContent(request)) {// 如果不是则停止PrintWriter writer = response.getWriter();writer.println("Error: 表单必须包含 enctype=multipart/form-data");writer.flush();return;}// 配置上传参数DiskFileItemFactory factory = new DiskFileItemFactory();// 设置内存临界值 - 超过后将产生临时文件并存储于临时目录中factory.setSizeThreshold(MEMORY_THRESHOLD);// 设置临时存储目录factory.setRepository(new File(System.getProperty("java.io.tmpdir")));ServletFileUpload upload = new ServletFileUpload(factory);// 设置最大文件上传值upload.setFileSizeMax(MAX_FILE_SIZE);// 设置最大请求值 (包含文件和表单数据)upload.setSizeMax(MAX_REQUEST_SIZE);// 中文处理upload.setHeaderEncoding("UTF-8");// 构造临时路径来存储上传的文件// 这个路径相对当前应用的目录String uploadPath = request.getServletContext().getRealPath("./") + File.separator + UPLOAD_DIRECTORY;// 如果目录不存在则创建File uploadDir = new File(uploadPath);if (!uploadDir.exists()) {uploadDir.mkdir();}try {// 解析请求的内容提取文件数据@SuppressWarnings("unchecked")List<FileItem> formItems = upload.parseRequest(request);if (formItems != null && formItems.size() > 0) {// 迭代表单数据for (FileItem item : formItems) {// 处理不在表单中的字段if (!item.isFormField()) {String fileName = new File(item.getName()).getName();String filePath = uploadPath + File.separator + fileName;File storeFile = new File(filePath);// 在控制台输出文件的上传路径System.out.println(filePath);// 保存文件到硬盘item.write(storeFile);request.setAttribute("message","文件上传成功!");}}}} catch (Exception ex) {request.setAttribute("message","错误信息: " + ex.getMessage());}// 跳转到 message.jsprequest.getServletContext().getRequestDispatcher("/message.jsp").forward(request, response);}}
message.jsp 文件代码如下:
<%@ page language="java" contentType="text/html; charset=UTF-8"pageEncoding="UTF-8"%><!DOCTYPE html PUBLIC "-//W3C//DTD HTML 4.01 Transitional//EN""http://www.w3.org/TR/html4/loose.dtd"><html><head><meta http-equiv="Content-Type" content="text/html; charset=UTF-8"><title>文件上传结果</title></head><body><center><h2>${message}</h2></center></body></html>
编译和运行 Servlet
编译上面的 Servlet UploadServlet,并在 web.xml 文件中创建所需的条目,如下所示:
<?xml version="1.0" encoding="UTF-8"?><web-app xmlns:xsi="http://www.w3.org/2001/XMLSchema-instance"xmlns="http://java.sun.com/xml/ns/javaee"xmlns:web="http://java.sun.com/xml/ns/javaee/web-app_2_5.xsd"xsi:schemaLocation="http://java.sun.com/xml/ns/javaeehttp://java.sun.com/xml/ns/javaee/web-app_2_5.xsd"id="WebApp_ID" version="2.5"><servlet><display-name>UploadServlet</display-name><servlet-name>UploadServlet</servlet-name><servlet-class>com.runoob.test.UploadServlet</servlet-class></servlet><servlet-mapping><servlet-name>UploadServlet</servlet-name><url-pattern>/TomcatTest/UploadServlet</url-pattern></servlet-mapping></web-app>
现在尝试使用您在上面创建的 HTML 表单来上传文件。在浏览器中访问:http://localhost:8080/TomcatTest/upload.jsp
a 标签用法
对于一般的文件直接用 a 标签的话,如下代码所示。由于浏览器可以解析jpg和txt文件,故不会直接下载而是在其他网页打开:
<a href="/IT/download/1.gif" rel="nofollow">下载图片</a><a href="/IT/download/day10.doc" rel="nofollow">下载文档</a><a href="/IT/download/day10.txt" rel="nofollow">下载笔记</a>
如果想要完成直接下载的目的,可以通过Servlet进行操作,做了一个简单的html页面
<a href="/IT/download?name=1.gif" rel="nofollow">下载图片1</a><a href="/IT/download?name=day10.doc" rel="nofollow">下载文档1</a><a href="/IT/download?name=day10.txt" rel="nofollow">下载笔记1</a>
我为download注册了一个servlet,xml描写如下:
<servlet><servlet-name>DownloadServlet</servlet-name><servlet-class>com.response.download.DownloadServlet</servlet-class></servlet><servlet-mapping><servlet-name>DownloadServlet</servlet-name><url-pattern>/download</url-pattern></servlet-mapping>
由于我的请求方式是get方式,所以只需在DownloadServlet这个类中重写doGet方法,代码实现如下:
public void doGet(HttpServletRequest request, HttpServletResponse response)throws ServletException, IOException {//获取文件名String filename=request.getParameter("name");//防止读取name名乱码filename=new String(filename.getBytes("iso-8859-1"),"utf-8");//在控制台打印文件名System.out.println("文件名:"+filename);//设置文件MIME类型response.setContentType(getServletContext().getMimeType(filename));//设置Content-Dispositionresponse.setHeader("Content-Disposition", "attachment;filename="+filename);//获取要下载的文件绝对路径,我的文件都放到WebRoot/download目录下ServletContext context=this.getServletContext();String fullFileName=context.getRealPath("/download/"+filename);//输入流为项目文件,输出流指向浏览器InputStream is=new FileInputStream(fullFileName);ServletOutputStream os =response.getOutputStream();/** 设置缓冲区* is.read(b)当文件读完时返回-1*/int len=-1;byte[] b=new byte[1024];while((len=is.read(b))!=-1){os.write(b,0,len);}//关闭流is.close();os.close();}
